This is 'supposed' to be the time of year for ice-cream and cold drinks, well with the weather here we are more likely to turn on the fire and drink cups of hot tea. But nevertheless for you readers from hotter climates or where your weather is actually consistent with the seasons heres a little variation on a hot chocolate suitable for the summer weather. A Frozen Hot Chocolate...
What you will need:
6 cubes of your favoerite chocolate
2 teaspoons of hot chocolate mix
1 1/2 tablespoons sugar
1 1/2 cups milk
3 ice cubes
whipped cream
chocolate shavings
What You Do:
Chop chocolate int smaller pieces and put in a double boiler over simmering water
Stir until melted
Add hot chocolate mix and sugar
Stir until melted
Remove from heat and slowly add 1/2 cup of the milk and stir until smooth
Cool to room temperature
In a blender place remaining milk, room temperature chocolate mixture and ice
Blend on high speed until smooth
Pour into a glass and top with whipped cream and chocolate shavings
Enjoy on a hot summers day
Thanks for reading, I hope you enjoyed this little recipe,
I always been on a quest to get whiter teeth. I mean who hasn't ?
Anyway I dont want to pay a arm and a leg for a product which claims to do so much but in reality does nothing at all.
So instead I decided to try so home made all natural products which dont cost any money what so ever, so if they didn't work then I wouldn't be out of pocket.
I came across one DIY product that I have been using for a couple of weeks now and I love it. I works so much better than any store bought products or expensive dental range items and its so simple...
what you need:
1/4 cup baking soda
lemon juice from half a lemon
what you do:
1) Mix two products together
2) Apply with a cotton ball or q-tip to teeth
3) Leave on for no longer than one minute then brush teeth and remove excess
4) Repeat 2 or 3 times a week for maximum results
I hope you found this useful !
Thanks for reading,
Rachel Ward
A couple of weeks ago I was kindly sent some cake decorating products by JustBake that made making, creating and decorating cupcakes a whole lot easier yet still had that 'WOW' factor that every great baker loves to hear.
1. Butterfly Sprinkles...
These sprinkles include a mixture or white, pink and yellow mini sugar butterflies that can be used to top cakes, cupcakes, biscuites or whatever takes your fancy. Me...I used them to decorate a batch of cupcakes which I will show you later in the post. They are so simple to use and can transform what was a plain cupcake into something all your family will be fighting over. They are small yet unlikely to break or snap as not one in the entire package was broken in transit which is defiantly a plus if you ask me as one of the worst things that can happen is for your decorations to break before you even have chance to use them. Not a problem with Just bakes Butterfly Sprinkles.
2.
Pink Flower Cupcake Decorations...
These Pink flower cupcake decorations are somewhat '3D' and have a lovely white detail in the centre of the flower. These are designed to top cupcakes although there not exclusively for cupcakes alone and of course can be used for other desserts and baking goods! I did use these for the cupcakes I made and they were perfect and so simple, they are a perfect alternative if you have limited time to create the perfect cupcake and instead of spending hours rolling out fondant or making gum paste to create your own flowers, simply spent less than 30 seconds opening the bag of pre made decorations and place them on your cupcakes!
3.
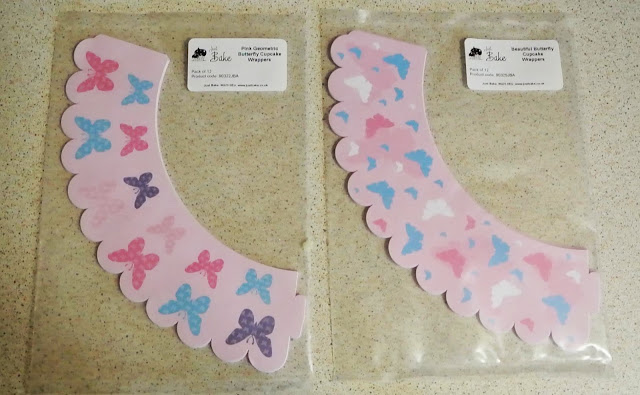
Cupcake Wrappers...
Just Bake were kind enough to send me not one pack but two packets of cupcake wrappers in two different designs. The first ones are Pink Geometric Butterfly Cupcake Wrappers and the second Beautiful butterfly Cupcake Wrappers. If you havent come across cupcake wrappers before they are kind of like muffin cases but instead of pouring your cake batter directly into the wrapper I baked my cupcakes in basic cases and once baked and cooled I assembled the wrappers and dropped one cupcake into each wrapper which immediately gave great results. The wrappers allow room to ice and buttercream the tops of your cupcakes without any spillage or buttercream drooping down the sides which is a brilliant little advantage to using these wrappers as oppose to just a cupcake case. They also have a variety of different wrappers for all different occasions so if pink butterflies aren't your thing then im sure you will find something you like among there many other options.
So I made a basic vanilla cupcake filled it with caramel and topped it with a pink vanilla buttercream, which alone would have been delicious but not visually spectacular and with these few items I was able to do just that and turn these plain looking cupcakes into cupcakes that looked like they belonged in the window of a bakery. Using the cupcake wrapper and sprinkles has been a revelation in my baking life and has made decorating a quicker experience for when I have little time to complete a job but still looks like I spent a lot of time decorating.
Video Demonstration:
Thank you so much to JustBake.co.uk for your kindness and generosity in sending me these products and I can say I have true-fully enjoyed using them and will defiantly be making some purchases from you soon.
These cupcakes went down really well at a party I was hosting and everyone wanted more.
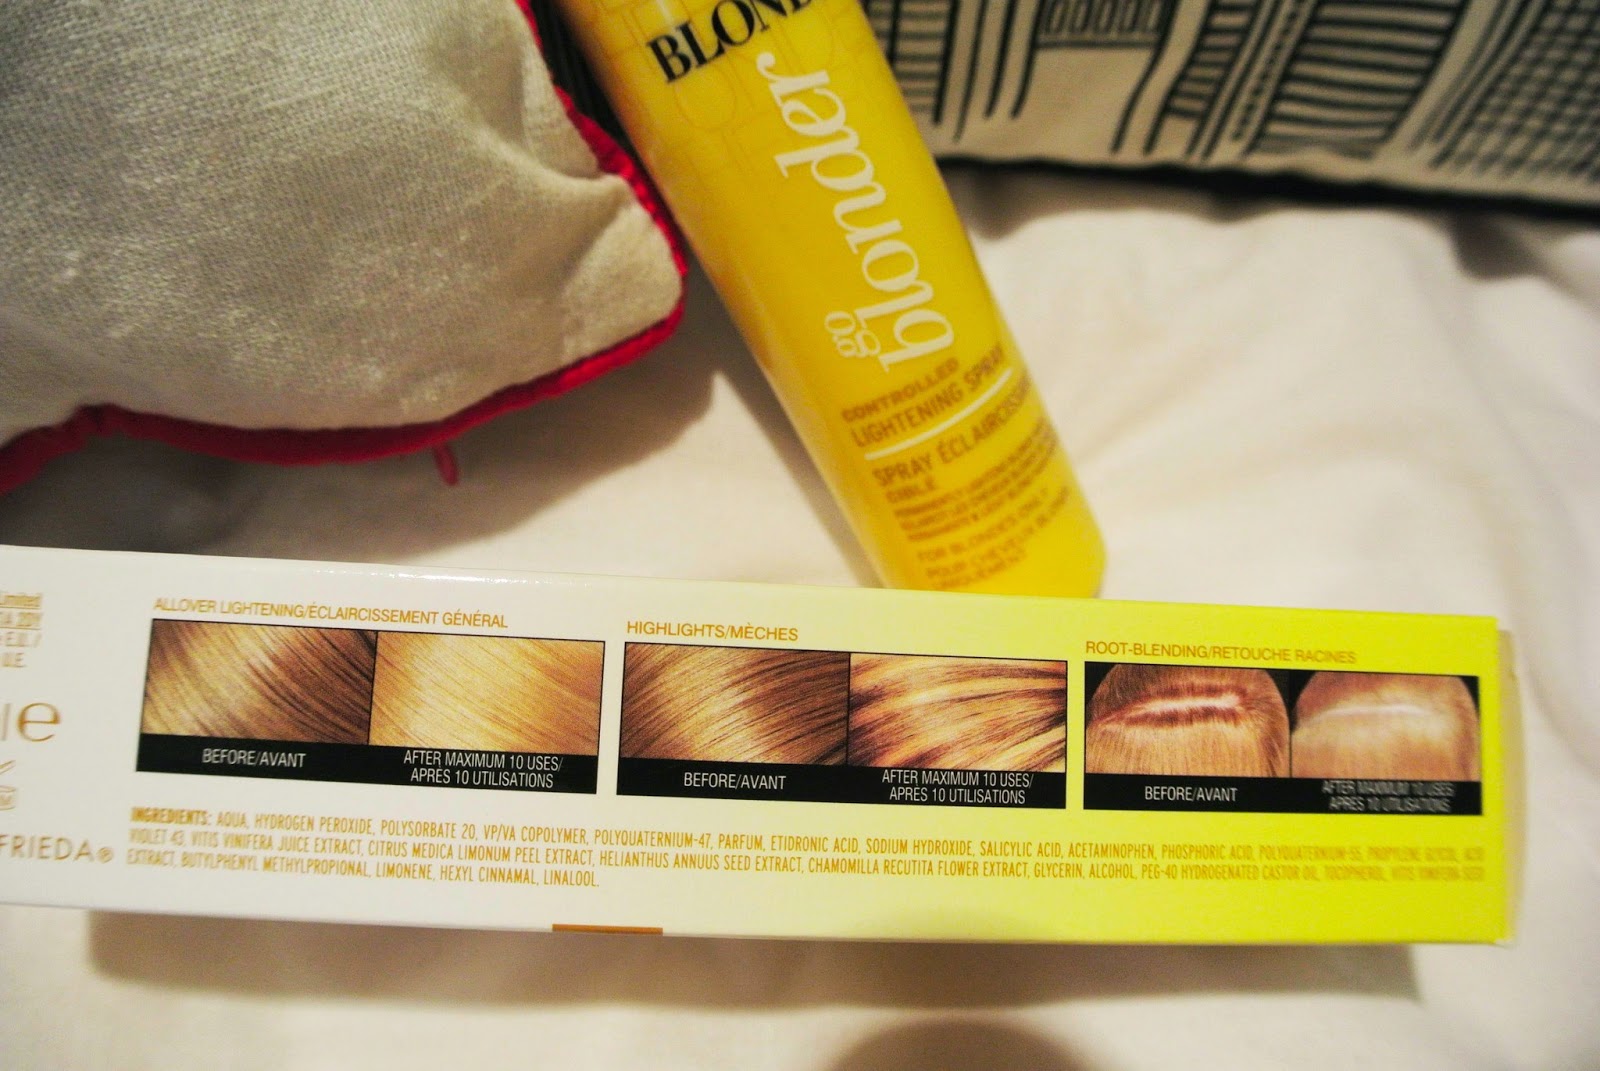
I've been on a quest lately to lighten my hair and for years I've been using 'sun in' which does what it aims to do, but I wanted to try something new and after taking advantage of the 3 for 2 offer at boots I decided to pick up a bottle of the lightning spray from John Frieda.
On the packet it aimed to lighten and brighten blonde hair up to one and a half shades and it gradually lightens in 3-5 uses. It does state in bold writing to NOT USE ON NATURAL BROWN OR DARKER SHADES OF HAIR, INTENSIVELY BLEACHED HAIR (LIGHTENED 4-8 SHADES) OR PLATINUM OR WHITE SHADES OF BLONDE HAIR.
As I wanted an all over lightening I washed my hair as usual and brushed though it to get rid of tangles and then sprayed my entire head with the spray rubbing my fingers all over my head to make sure it was evenly coated, then took a blow dryer and dried my hair as normal. I immediately noticed improvements to my hair in terms of lightness and colouring. and thought I had found my new holy grail product.
I was wrong.
I used this product maybe once every two weeks for about a month and a half and my hair started to become very knotty after washing and the more I brushed the more knots and tangles appeared, my hair started to come out in clumps on my hairbrush and I had to use two different leave in conditioners and detanglers to make my hair somewhat brush-able. On top of this my hair began to turn a very coppery/orange colour which I did not want. I felt this product had ruined my hair and my initial joy with this product soon turned into hatred for it.
I spoke to my hairdresser who recommended I use a purple shampoo and conditioner to get rid of the orange tones to my hair and to deep condition it once a week with hair masks. I have since took her advice and the shampoo and conditioner I use is from a company called 'Provoke' and they work amazing and have rid my hair of the copper colour and instead brought out the lighter tones that I initially wanted without the bleach or peroxide that was in the John Frieda spray.
There is no way I would use this spray again as it ruined my hair and my hair has never been the same since (4 months ago i stopped using it) my hair still tangles and goes really knotty after washing and I couldn't live without my Aussie leave in conditioner as it works wonders.
So I hope I warned you about this product, and to us it at your own risk. I have since researched into the 'go blonder' collection by John Frieda and there have been many horror stories behind these products. I wanted to give my honest opinion about my experience with this product and I am sorry that I cannot be more positive as I had high hopes prior to using it.
3 sticks unsalted butter, softened 3/4 cup sugar 3 cups all-purpose flour 1/2 teaspoon salt
Filling:
6 tablespoons unsalted butter 1/2 cup light brown sugar 12 Granny Smith apples (about 6 pounds)—peeled, cored and thinly sliced 1 tablespoon cinnamon 1/4 teaspoon freshly grated nutmeg 1/2 cup water, if necessary
Topping:
3 cups quick-cooking oats 2 cups all-purpose flour 1 1/2 cups light brown sugar 1 1/4 teaspoons cinnamon 1/2 teaspoon baking soda 1/2 teaspoon salt 3 sticks (12 ounces) unsalted butter, cut into 1/2-inch cubes and chilled 3/4 cup chopped pecans (optional)
Make the Crust:
Preheat the oven to 375°.
Line a 15-by-17-inch rimmed baking sheet with parchment paper.
In a standing mixer fitted with the paddle attachment, beat the butter with the sugar at medium speed until light and fluffy, about 2 minutes. At low speed, beat in the flour and salt until a soft dough forms.
Press the dough over the bottom of the prepared pan creating an even layer.
Bake in the center of the oven for about 20 minutes, until the crust is golden and set. Let cool on a rack.
Make the Filling:
In an extra large skillet, melt 6 tablespoons of the butter with 1/2 cup of the light brown sugar.
Add the apples to the skillet and cook over high heat, stirring occasionally, until softened, about 10 minutes.
Stir the cinnamon and nutmeg.
Cook until the apples are caramelized and very tender and the liquid is evaporated, about 10 minutes longer;
scrape up any bits stuck to the bottom of the skillet and if necessary, add up to 1/2 cup of water to prevent scorching.
Let cool.
Make the Topping:
In a large bowl, mix the oats with the flour, light brown sugar, cinnamon, baking soda and salt.
Using a pastry blender to cut in the butter until the mixture resembles coarse meal.
Stir in the pecans and press the mixture into clumps.
Assemble and Bake:
Spread the apple filling over the crust.
Scatter the crumbs on top, pressing them lightly into an even layer.
Bake in the center of the oven for 1 hour, until the topping is golden; rotate the pan halfway through baking.
Let cool completely on a rack before cutting into 2-inch bars.
I've recently been so motivated to go out and do things with my life instead of wasting the days away watching reruns on Friends on TV and whenever I read a quote that pulls a string in my heart or sparks a lightbulb in my brain I get more and more exited for what the future has to offer. Maybe thats because for once in my life I actually have the next few years of my life somewhat planned out and I know what I want to do and hopefully I can turn these dreams into reality. Firstly next month im talking a road trip or 'trek' as its know across the USA from New York to LA and im so exited to experience all these new things that America has to offer. When I return to sunny England (sarcasm) I will be completing my final year at university *Yippie* and simultaneously working a part time job to save fro my big adventure which I've been planning for some time now. After uni is done I plan to fly across the world to Australia to work and travel for 1 year minimum and see what life has to offer, be spontaneous and do things I've never done before.
So go out into the world and do the things you've always wanted to do. Dont let people or obstacles get in your way, not matter now long something takes always remember that it doesn't matter when you get there just as long as you arrive.
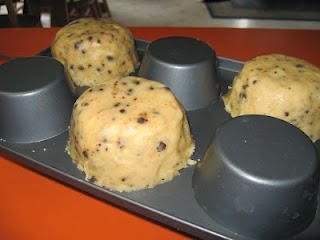
Everyone loves ice cream, and ice cream sandwiches well they cant be beaten, really? How about a bowl that you can eat? a bowl made of cookie that you can fill with your favorite ice cream and to top it all of there is no washing up at the end. These would be perfect for children's partys or BBQs during the summer !
Its as simple as turning your muffin tin upside down and moulding the cookie mix over the top (make sure you use a non spreadable sugar cookie mix) you want the cookie to keep its shape, heres a simple versatile recipe for a basic cookie:
Ingredients:
1 cup butter, softened
1 cup superfine sugar, or granulated sugar, processed in blender or food processor for 30 seconds
½ tsp. Salt
1 large egg
1 large egg yolk
2 tsp. Vanilla extract
½ tsp. Almond extract or emulsion, optional
2 ½ cups all-purpose flour.
Method:
Cream butter, sugar and salt until light and fluffy, about 3 minutes with mixer set at medium speed Add yolk, beat well.
Add whole egg, vanilla and optional almond extract and beat until well-incorporated.
Add flour; beat at low speed just until flour is mixed in; do not overmix.
Divide dough in halves or thirds and wrap in plastic wrap. Refrigerate until firm, at least one hour and up to 2 days.
Preheat oven to 375 degrees. Dust work surface and rolling pin with flour. Roll dough to 1/4" thick, sprinkling with additional flour as needed to prevent sticking.
Cut into desired shapes and place on parchment or silicone-lined pans.
Bake in preheated oven until cookies appear dry on the surface and are light golden brown on the edges, about 10 minutes (very large cookies may take up to 12 or 13 minutes).
Remove from cookie sheets to cooling racks and cool completely before decorating.
Once your cookies are cookie bowls are baked and cooled, fill them with ice cream and sprinkles and away you go !!!